Monday, November 13, 2006

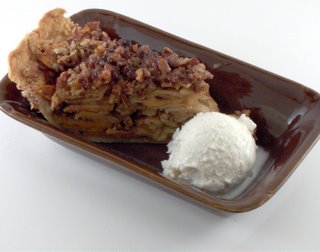
Apple Sweet Potato Pie

This is a creation that I would like to call my own (well, with a little help from my father). The idea for this pie came from a recipe card that my dad picked up at the grocery store. It was for an apple and sweet potato casserole. He gave me the recipe and suggested that I make it. From looking at the ingredients, I figured that it would make a good pie. Apple Pie is good and Sweet Potato Pie is good, so combined it should be good.
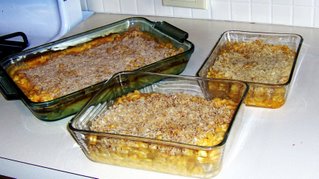
I cheated on the pie crust, using ready made; but the rest was all homemade. I'm not going to go into the whole recipe here, but if anyone is interested, drop me an email or a comment and I will give you all the details.

This pie was actually made in 2 steps because I wasn't fully happy with the result after the first baking. After the first bake, I had basically made the casserole on the recipe card, but in a pie crust. It tasted much more like a side dish than a dessert.

On the suggestion of my father (who got to taste the pie during the first step), I rebaked the pie with a cinnamon-sugar syrup. I boiled some sugar, water, cinnamon, and nutmeg until thickened and poured the syrup over the pie. I then baked the pie for another hour at 300 C so that they syrup could soak in and the sweet potato would get more tender. The result above was from after the second bake.

If you don't like sweet potatoes, you will probably not like this pie (even after the second bake). But if you like them, then this is the pie for you.

Labels:

Macaroni and Cheese Showdown

This year I've been asked to make macaroni and cheese for the family Thanksgiving dinner. Those who regularly read my blog know that I don't like doing things in the same old way and this side dish would be no exception. I looked over the Food Network website and found 2 promising recipes. One was from Alton Brown and the other was from the show The Best Of. As a control to my experiment to find out which was the best, I also prepared to make a box of deluxe mac and cheese.

If you look at the recipes, you can see that a lot of different cheeses are necessary. Because of this, I started my day by making a trip to the West Side Market because I knew that I would be able to get all the cheeses I needed, in the portions that I needed, at a good price.

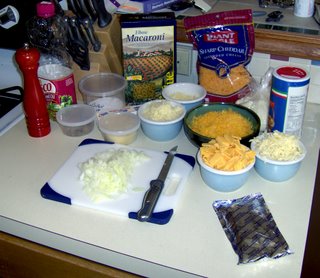
So there are all the ingredients I used to make the 3 batches of mac and cheese. There is a whole lot of cheeses (all shredded or chopped by hand except for the bag of sharp cheeder, there is a better sharp cheeder in the green bowl), onion, bread crumbs, salt, pepper, oil, mustard powder, macaroni, and the cheese packet (I use that term loosely).

To speed things along, I boiled all of the macaroni needed for the 3 batches at the same time. It was drained from the water and set aside. I made the easy deluxe batch first which only required that I mix the stuff in the pouch with the macaroni. I put into a baking dish and topped it with buttered bread crumbs. The other two recipes were fairly simple; the only unique thing they required was that a roux be made (which is easy, just follow the directions). These were also topped with bread crumbs and baked. The Alton Brown recipe called for panko bread crumbs and the other used regular bread crumbs.

Since I was tasting the sauces while I was making them, I already had a good idea in my head as to which one I preferred. But I didn't want to be the sole decider so I had my parents sample all 3 batches. They agreed with my choice.

The winner: The Best Of.... recipe.

We all found this one to have the best flavor. It had a very smooth texture and the cheeses blended well with each other. The one from Alton Brown wasn't bad, but just not as good as the winner. So that is the one that I will be making for Thanksgiving dinner.

Labels:

Thursday, November 09, 2006

Home Office a.k.a. Transformers Room

Here is another from the "What's He Cooking UP Files..."

HPIM1928.JPG

For the past month or so I've been working slowly on turning a storage room in my basement into a home office. My plan is that when I eventually go to sell this house I'm currently in, I'll be able to set up this room as an office and have the 3 bedrooms upstairs all staged as true bedrooms (which should help to sell the house). In the meantime, the true office will remain upstairs and the new office in the basement will be a place where I can display my Transformers collection.

I wish I had thought to take a few before pictures. The room was a dreary dark room. There was a single light in the center of the room, dark paneling (and closet doors) and a black linoleum floor. The ceiling was tiled but was old and yellowed. Since it was in the basement and there is little opportunity for natural light, I went very light in my choices of colors for the office.

After I cleared out the room (and ripped down the old ceiling, light, and closet doors), I went to Home Depot and went into debt buying everything I would need to put the room back together. I did fairly well on buying everything in one shot. I got almost everything I needed to put a new drop ceiling, 4 new light fixtures and all the wiring needed for them, 1 gallon of paint (I ended up needing 2), new mirrored closet doors, carpet off the big rolls, and all of the bits and pieces that would also be necessary.


HPIM1927.JPG

The ceiling is a faux drop system called Ceiling Max. It uses the same tiles that a drop ceiling would, but instead of running wires to hold up the support bars, you screw the bars into your ceiling joists. It looked really easy and if two people are working together, it probably is. I put the ceiling up on my own and found it to be a bit of a challenge to hold the pieces up while screwing them in place.

When the ceiling was about halfway completed, I took the opportunity to put in the new light fixtures. I had to take the single light fixture and break it off into 4. To do so, I put a junction box where the original light was and then wired to the new lights. They got their own light boxes at each location. After the lights were in, I finished the ceiling (after running back to Home Depot and picking up a few extra pieces of grid).

The next step was to lay out and cut the carpet. I bought just a little more than I needed to cover the room so trimming was minimal. The most difficult part was trimming around the closet opening so that the floor of the closet was also carpeted. The closet doors went up soon after and other than having to have a replacement face piece at the top sent to me since the first one was scratched as was the one still in package at the store, they went up easily.


HPIM1930.JPG

Oh, I then went out and bought all the molding for around the windows, the closet, and the baseboards. I borrowed my Dad's portable air compressor and brad nailer so that went up easily.

I found a good deal on the bookcases online at Staples. They were $25 each and since I ordered 3, I got free shipping. They were simple to assemble and by the last one I had gotten pretty good as pounding in the small nails that hold on the back panels. The display cases used to be up in my bedroom, but since pretty much everything was coming downstairs, I moved them down too.


HPIM1931.JPG

I had thought for a long while about what to do for a desk and eventually settled on making my own folding table. At the woodworking store they have the folding legs and I got a piece of MDF from Lowes cut to the size I wanted. After attaching the legs, I draped some fabric over the table as a temporary covering. Eventually I will either router the ends of the mdf or trim them out and then paint the table top. I still have to make curtains, but I haven't decided on what fabric I want to use yet.

So that's the room. In the end, the most time consuming part has been setting up the Transformers. I've tried to keep series together for the most part and set up a few scenes. I'm happy with how they look.

Labels:

Wednesday, November 08, 2006

Review: Pillsbury Gingerbread Dough Sheets

I was at Super Walmart this past weekend and they had these on sale for $2. I figured that for $2, I would give them a try and post the review for my readers. According to the package, you get 2 dough sheets and 2 packages of icing. You provide your own cookie cutter. It says that you should be able to make 24 2" cookies.

Here is what you get when you open the package. Since it is gingerbread, used the appropriate cutter. The suggestion on the package was that you should take the extra dough that is too small to be cut and roll into balls, roll the balls in sugar, then flatten. I followed the directions fully.

I ended up getting 22 cookies. Had I planned the cutting a little better, I probably could have gotten one more gingerbread man and I could have made the rolled cookies a little smaller which would have given me the 2 dozen that the package states.

I baked the cookies for about 10 minutes. After they were cooled, I iced the cookies using the provided packs.


The icing packs were not the easiest to work with since they are small and cutting a round opening in them isn't that easy. I probably could have done a better job on the icing but it was already 9:30 on Sunday night and I wanted them done so I could go to bed.


Now for the review. For the price and the ease, these are well worth it. Granted, you could make a dough for much less, but it makes a mess and you still have to roll it out. The cookie was a bit more on the crisp side than what I prefer, but for gingerbread, it was alright. The rolled cookies were a little thicker and a bit softer and I liked those ones better. If you are one who makes gingerbread houses or ornaments, this dough would work very well for those purposes. You would probably have to buy a couple packs to get enough dough to make a decent sized house, but I think that it would be justified just for the fact that the dough sheets are a uniform thickness.

Actually, after writing that, I think I might try my hand at making a little gingerbread house this year. I haven't made one in years and that could be something to fun to do. If I make one, I'll be sure to post pictures.

Labels: ,