Monday, February 27, 2006

Pork in Barbecue-Wine Sauce

Sorry that there is no picture for this one; I made it this past weekend at my parent's house. Since Sunday was going to be a very hectic day I decided that slow cooker cooking would be the best way to go to get dinner started. I looked through their freezer and found some pork "steaks" and then went looking for a cooking liquid. One thing I've learned about slow cooking is that beef (beef with a good amount of fat on it) cooks well without much extra liquid but that pork needs a cooking liquid (otherwise its very dry and there is no flavor).

While looking the cabinets the only thing I could find that looked like it would work okay was barbecue sauce. I'm not a big fan of the sauce myself so I came up with a way to water it down and add more flavor (wine!). My original thought was to use a dry red wine but all that was available in the house were sweet whites and a semi-dry chardonnay. Since the chardonnay was the driest wine in the house and also the least expensive bottle I opted to use that. So into the slow cooker went a small can of tomato sauce, about 3/4 ths of a bottle of barbecue sauce, a half bottle of chardonnay, some salt, pepper, and cinnamon (it adds another hint of flavor) and a bit of water (maybe a half cup). I wisked that all together and put in the pork. The meat cooked for about 7 hours on low and when it was done it was nice and tender and full of flavor. It a slight barbecue taste and was slightly sweet. It was quite different than what we were used to.

Everyone liked it well and its something that I will keep to make again. I think next time I would rather use a dry red wine so maybe I will try that sometime soon. I'll be sure to post a picture next time too.

Labels:

Thursday, February 23, 2006

Review: Ready to Eat (Microwaved) Green Beans

So I saw in these advertised in the grocery circular and decided that I would give them a shot. It turns out that they are pretty good. The green beans are pre-washed (the bag says triple washed) and to cook them you only need to pierce the bag and microwave for 5 minutes. I added the slivered almonds and some kosher salt to mine since they were a little bland right out of the package.

The color on the beans was amazing. They remained bright green throughout the cooking process and present really well. And what's even better is that they were actually cooked the whole way through and still green. Usually at restaurants the bright green beans have only been blanched and are too crunchy for my tastes, that wasn't the case here.

All and all, they're pretty good. I grew up eating canned green beans and for the difference in price (these were on sale for $2.50 whereas you can get a can of canned beans on sale for about 50 cents) I will probably continue eating the canned ones for everyday meals, but if I'm making a fancier meal or having people over for dinner, I will pick up these ones. They look great on the plate and taste well too.

Labels: ,

Super Simple Pot Roast

Alright, I want to start by saying that the picture does not do this meal justice. I just wanted to get that out there.

So I'm calling this Super Simple Pot Roast since the amount of effort required to put this together is close to nill. For the cookware you'll only need a slow cooker and a frying pan and some tongs or a big fork to flip the roast and transfer it to the slow cooker. The ingredients for this dish are: a roast (I just bought what was on sale, mine was about 2.5 lbs in size, make sure that you don't buy a roast bigger than your slow cooker), a bag of frozen stew vegetables (the one I got had potatoes, carrots, celery, and onions), and some salt and pepper. Yea, that's it, 4 ingredients since the vegies all come together in a bag (which only costs a $1 at the grocery store). It's a budget friendly meal too.

To put it all together first put the vegies in the bottom of the slow cooker and turn the thing on (either high or low depending on how long you have for the meal to cook, if you are going to let it cook all day, use low, if you want it ready in about 4 hours, use high). After you have the vegies in the cooker, put your frying pan on the stove and get it nice and hot. Your going to be searing the sides of the roast. Open the roast and salt and pepper one side. Once the pan is hot, put the seasoned side down in the pan and season the top side. Don't touch the roast for at least a few minutes. If you try to pull the roast away from the pan too soon it will stick to the pan, you'll know when its ready to be turned when it is easy to flip. Once flipped, brown the other side for a few minutes. Once the roast is browned (depending on the shape of your roast you might want to do all 4 sides, might was pretty flat so I just did the top and bottom) transfer it to the slow cooker. Put the lid on the cooker and let everything cook down.

As the roast cooks its juices will drip down in the vegetables giving them great flavor.

Hours later..... your roast is done and ready to eat. If you like your vegetables a little more firm then I would suggest adding more fresh (not frozen) vegies to the slow cooker about an hour to an hour and a half before you plan to eat. That give plenty of time for the vegetables to get tender but not too soft.

Labels:

Monday, February 13, 2006

Kitchen Makeover


As you can see from the picture and the title of this post this isn't a food entry, but since this is what I did this weekend instead of cooking I decided to show it off. You can click on the picture to see a larger version if you would like.

The main purpose of this mini-makeover was to remove the border that was in the kitchen when I first bought the house. I'm sure for some people its a nice border, but it doesn't suit my tastes at all. In addition to that, I was sick of seeing the purple-pink color that was beneath the border. When I decided to get rid of those, I also chose to remove the ceiling fan (which I believe the motor was almost shot and I was afraid to leave it on since it would make a strange grinding sound) and the kitchen ceiling light (not pictured).

So last week I started clearing out the kitchen and dining area and began removing the border. The upper portion came off easily since it was attached to the white portion of the wall (which was just primer) but the lower portion which went over the paint could not be peeled off. I ended up borrowing a steamer last weekend and used that to remove most of the paper. On Friday night I patched some holes in the wall and cleared out the rest of the kitchen. Then the real fun began on Saturday.

I woke up still sick on Saturday morning (I had a headcold start Friday morning and its still sticking around) but I started working on the kitchen anyway. I sanded down all the placed I had patched and then primed all the walls, doing a second coat of primer over the purplish color. I then headed off to Lowes to buy my paint and trim. I looked at lighting there but didn't find anything that seemed quite right. When I got home I got right to painting and a few hours later had all the walls painted. The brown color goes around the entire kitchen below the chair rail line. The upper portions are two different colors (the front wall is a slightly darker color than the rest of the walls). At this point I took a rest for a while both to let all the paint fully dry and myself to recuperate. Later in the evening I started measuring and cutting the chair rail and baseboards and began putting some of that up. Thanks to Liquid Nails, I was able to do this on my own. I stuck the molding up and then put a couple finish nails in there to secure it. I only had one tube of the stuff on hand so I ran to Home Depot to get more and check out their lights. When I got back, I did a little more I was getting pretty tired so I stopped about halfway though.

On Sunday morning I finished the molding and put the refrigerator back in its cubby and put the cabinets back up (which had to be removed to get the refrigerator out). I then went back to Home Depot and bought the lights. Although I had looked at these ones last night I wasn't sure they were the ones I wanted then but when I looked at them a second time they seemed right. Then after a stop at the grocery store I was back home and installing the new lights. Once the lights were up I cleaned up the kitchen and put everything back.

The kitchen feels a whole lot warmer now. And I am really glad to see that border go. My house is now border free which is a very good thing.

Labels:

Wednesday, February 01, 2006

Crock-Pot Chili w/ Venison


Earlier this week I was chatting with my friend Rob about the benefits of slow-cooking. From this conversation I got a craving for some chili. And since my Dad had given me a couple small venison steaks and since I've never used it in chili before I decided to give it a try.

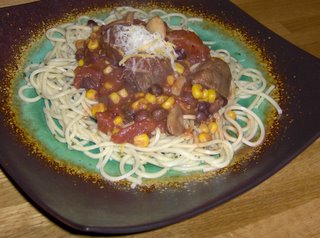
I used my usual technique of first browning the meat in a sauce pan and then adding it and all the other ingredients to the crock pot (along with spices). My typical mix is some beans, corn, and tomatoes but you can add other ingredients based off your liking (and most importantly, what's in your pantry). So I got everything in the slow cooker and left for work. When I came home this evening I was greeted to the smell of delicious chili.

To go along with my meal (since I was out of crackers) I made a little pasta. While cooking the pasta I remembered that this past weekend I picked up some frozen fresh basil at Trader Joes. They have these little ice cube tray looking things with a teaspoon of chopped herbs per cube. I think there are 3 different herbs to choose from. Since the pack of 20 little cubes was less than $2 I added it to the cart. So tonight I took out one of the cubes and added it to the cooked pasta; it thawed instantly. I then spooned some chili on top of the pasta along with a little cheese and my meal was made.

I like how the chili turned out but what really made the meal was the basil on the pasta. It added so much flavor and really balanced out well with the spiciness of the chili. As for the venison, there was a slightly different flavor than the usual beef chili, but really, if you didn't know it was venison, it would be hard to tell.

Labels: